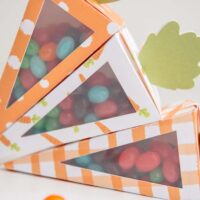
How to Make a Paper Carrot Box with Cricut
Make a paper carrot treat box using cardstock, glue, acetate sheets and a Cricut cutting machine.
Yield: 1 carrot box
Cost: $2.00
Equipment
- Cricut Cutting Machine
- Cricut LightGrip Blue Mat
- Craft glue
Materials
- Cardstock
- Acetate
- Carrot box svg
Instructions
- Upload carrot box SVG to Cricut DesignSpace. Add to new canvas.
- Highlight the file and click “Ungroup.”
- Select the scoring lines layer.
- Under “line type” on the top left toolbar, click the drop-down and click on “score.”
- Use the eye-icons to turn off the blue acetate window and the green stems layers.
- Highlight the entire group and attach.
- Change the size to a width of approximately 8 inches and a height of approximately 10 inches. Click "Make it."
- Hit continue and select medium card stock as the material, more pressure for cutting, and if using a scoring stylus instead of scoring wheel be sure to let your machine know under edit tools.
- Load the card stock onto a blue LightGrip mat and hit go. When finished, unload the mat and remove the box from the mat.
- Turn the acetate triangle back on in the layers panel and turn off all the other layers.
- Hit make and choose “On mat” on the next screen. Choose acetate as the material. Adjust the pressure to More pressure. Load a sheet of acetate onto a blue LightGrip mat and load it into your machine. Hit “Go” and unload the mat when the cut is finished.
- Turn the green stems back on in the layers panel and turn off all the other layers.
- Hit make and load a sheet of green or patterned card stock onto a blue LightGrip mat. Set material to medium card stock, more pressure, and hit go.
- Once all pieces are cut, assemble the boxes. Begin by folding all the score lines.
- Glue the acetate triangle/window onto the inside of the box around the cutout triangle.
- Glue the separate stems onto the stems attached to the carrot box. Match up the shapes for each side and glue the green leaf/stem onto the box. Allow the glue to dry fully.
- Add glue to the outermost tab and fold it over. Use gentle pressure to fold and attach to the opposite side. Allow drying completely before proceeding.
- After everything has dried, close the top of the box by folding all tabs inward. Fold the top leaves together.
- Feed the two stem tabs through the slit on the top. Fold the small circle tab down and through the small slit on the side to hold the tabs closed.