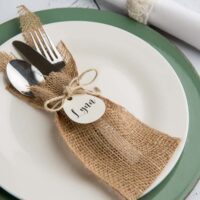
How to Make Bunny Ears Easter Silverware Holders
Yield: 1 utensil holder
Equipment
- Cricut Cutting Machine
- Hot glue gun and glue sticks
- Cricut LightGrip mat (blue)
- Ribbon of your choice
- Printer (if using Print then Cut)
- Pen or Sharpie
- Scissors
Materials
- 65-80 lb Cardstock 8.5″ x 11″ sheets
- 5″- 6″ Burlap
- Easter Silverware holder SVG file
Instructions
- Upload the silverware holder SVG file into Design Space.
- Highlight the design and click “ungroup.”
- Turn off all the other layers by clicking the eye icon on the right-hand side of the layers panel.
- Click "make it."
- Choose On mat printing. If the design looks fine, click continue.
- Choose Medium cardstock as the material and increase the cut pressure.
- Put cardstock on a LightGrip mat. Load into the machine and click "Go." Unload mat when finished and remove bunny from the mat.
- There are 4 shapes you can cut out and use to put names on for place settings. You can print and then handwrite the names.
- To use print then cut for the names, use the text option to add the name or names to the canvas.
- Move the name to where you’d like it on the tag. Select both layers (the tag and the text) and hit flatten on the bottom right of the dashboard.
- Click “Make it” and then follow the prompts to send the tag to your printer to print. You can print on paper or cardstock.
- Remove the paper from your printer and put it on a blue LightGrip mat to cut. Follow the prompts in Design Space to load the mat into the machine to cut. Unload the mat when finished cutting and remove the tags from the mat.
- Once all pieces are cut, use the ear tracing template and trace the tops of the ears on the burlap.
- Line up the silverware to determine the length of burlap needed to cut and fold over to create the pocket for utensils. After the length is cut, line up the edges and apply a line of hot glue down each side.
- Use the ribbon to tie a bow from the back of the pocket to the front, add the tags previously cut, and you’re finished!